Automate Your ASP.NET Core HTTPS IIS Setup with PowerShell
In solutions that comprise multiple ASP.NET Core projects, each project is typically deployed as an independent IIS site in the production environment. Consequently, replicating a production-like setup in the local development environment is essential for ensuring consistency, reducing deployment issues, and improving overall reliability.
- Consistency – Avoid “It works on my machine” issues by matching production settings.
- Security – Test HTTPS, certificates, and CORS behavior early.
- Realistic Testing – Debug multi-site and multi-service interactions locally.
- Deployment Alignment – Use the same hosting model to simplify CI/CD and releases.
- Team Efficiency – Automate setup so every developer runs the same environment.
To achieve this goal, we need to manually complete the following process.
The actual configuration is more complex than the flowchart suggests. For example, when dealing with multiple ASP.NET Core projects, site creation and certificate binding need to be performed individually for each project.
Manual configuration of IIS sites and certificates is time-consuming, error-prone, and highly repetitive. It is difficult to manage at scale, hard to version or reproduce across environments, and does not integrate well with automated deployment pipelines, making consistent and efficient deployment challenging.
Scripting with PowerShell
Ways to generate certificates
There are several ways to generate HTTPS certificates for local development: IIS Manager, OpenSSL, .NET CLI (dotnet dev-certs), and PowerShell.
-
IIS Manager provides a quick GUI option but is not suitable for automation.
-
.NET CLI (dotnet dev-certs) generates certificates for the current user and works well with Kestrel or Visual Studio, but these certificates are not machine-wide, require manual export for IIS, and offer limited customization.
-
OpenSSL is powerful and cross-platform but requires manual installation and complex commands.
-
PowerShell allows full control over certificate properties, can be used in the Local Machine store, and integrates easily with automated workflows, making it ideal for repeatable setups across multiple projects.
For solutions to be deployed on IIS, which are typically developed as ASP.NET Core projects on Windows, PowerShell provides a convenient and flexible way to generate self-signed certificates. For front-end projects, which are platform-independent, developers can use CrossSSL to export certificate and key files, ensuring cross-platform compatibility.
Click the link below to download and use the PowerShell script for generating self-signed certificates and configuring IIS: Download the PowerShell script
Parameters Overview
Mandatory parameters
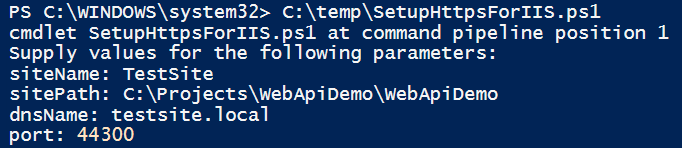
The script accepts several parameters to configure the IIS site and certificate:
- siteName – Specifies the name of the IIS website to create. This name will also be used for the corresponding Application Pool.
- sitePath – Defines the physical path for the website content.
- dnsName – The DNS name to use when generating the self-signed certificate. The script will automatically create the corresponding host-to-IP mapping in the system.
- port – The port number for the HTTPS binding.
Optional Parameters
- outputFolder – (default:
C:\ProgramData\${siteName}) The folder where the generated certificate files will be saved. If the folder does not exist, the script will create it automatically. - validYears – (default:
3) The validity period of the self-signed certificate in years. - password – (default:
${dnsName}123) The password used to protect the exported PFX certificate.
# Using default optional parameters
.\setup-https-for-iis.ps1 -siteName "DemoSite" -sitePath "C:\inetpub\Demo" -dnsName "demo.local" -port 443

# Customizing optional parameters
.\setup-https-for-iis.ps1 `
    -siteName "DemoSite" `
    -sitePath "C:\inetpub\Demo" `
    -dnsName "demo.local" `
    -port 443 `
    -outputFolder "C:\CustomFolder\DemoSite" `
    -validYears 5 `
    -password "MySecret123!"
Artifacts
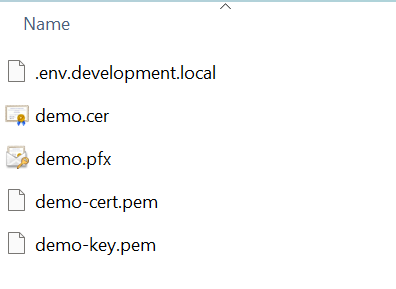
After running the setup-https-for-iis.ps1 script, several artifacts are generated to configure the IIS site and HTTPS certificate:
- Self-signed certificate files – A PFX file (with private key), A CER file (with public key) and optionally separate PEM/KEY files for cross-platform use(frontend). An .env.development.local file is created for front-end development to provide the paths to the PEM and KEY files.
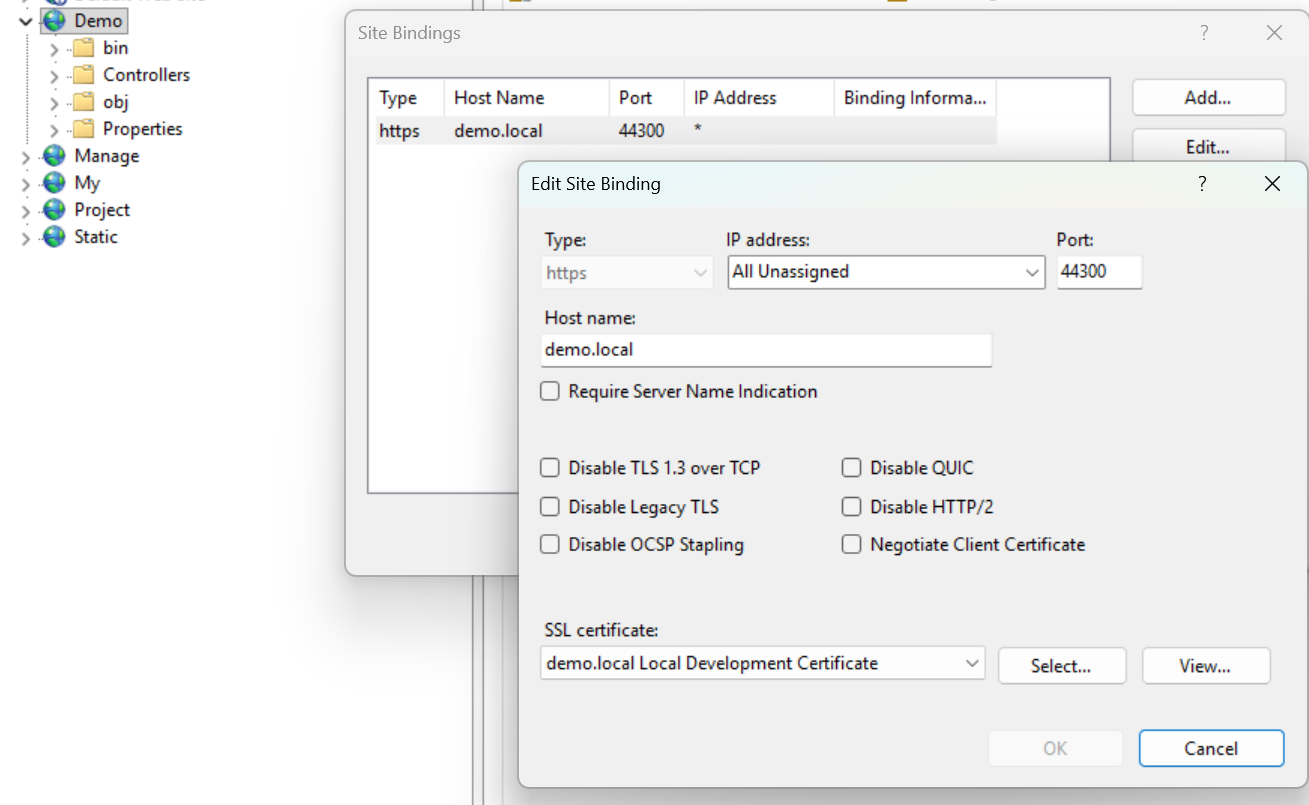
- IIS site and Application Pool – The script creates an IIS website and a corresponding Application Pool named after siteName, with HTTPS binding configured using the generated certificate.
- Host-to-IP mapping – The script automatically updates the system’s hosts file to map dnsName to 127.0.0.1.
These outputs enable immediate IIS debugging and HTTPS support for the configured site without additional manual steps.
C:\Windows\System32\drivers\etc\hosts
...
127.0.0.1     demo.local
...
Debugging Back-End with IIS in Visual Studio
Debugging ASP.NET Core Projects with IIS in Visual Studio
To debug an ASP.NET Core project using IIS, you must first create an IIS launch profile. This profile links the project to the corresponding IIS site and binding, allowing Visual Studio to launch the site through IIS and attach the debugger correctly.
Note: Visual Studio must be run with administrator privileges to allow IIS debugging.
Open “Launch Profiles” window and create a new profile decribed as follows:
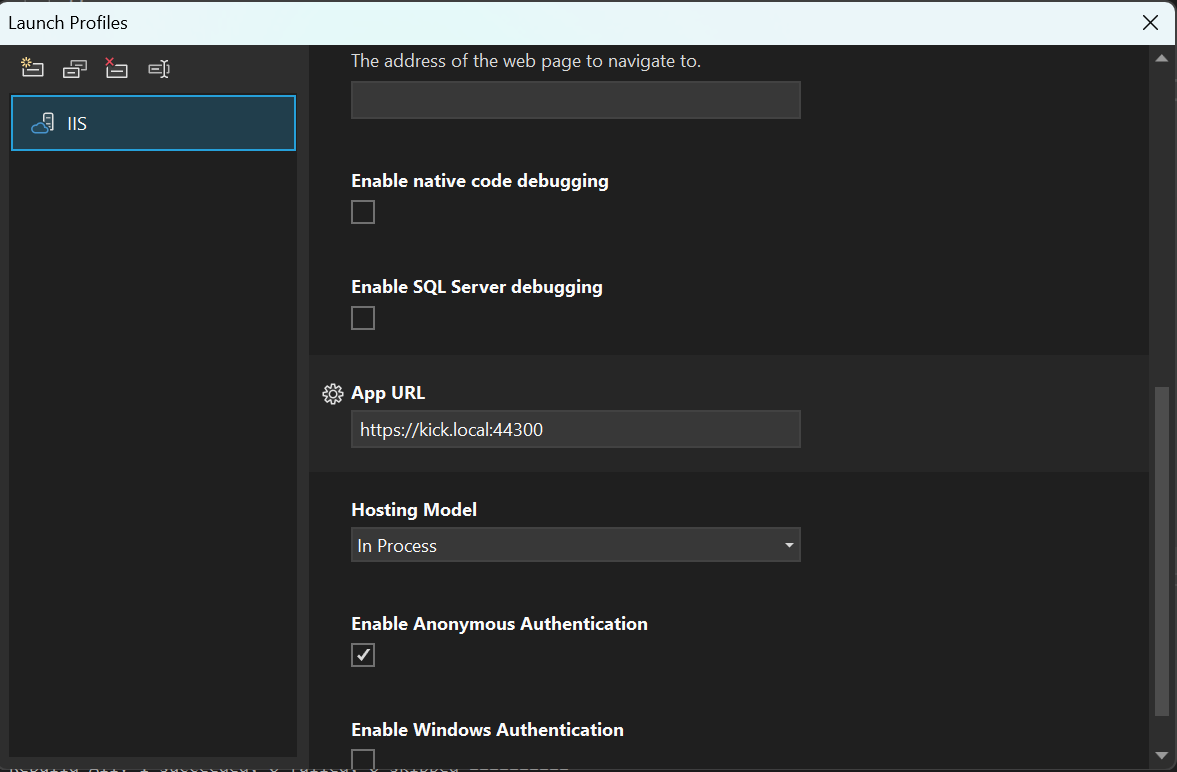
Once created, select this profile from the run/debug dropdown and start debugging. Visual Studio will launch your project through IIS and attach the debugger automatically.
Running Front-End with HTTPS in VS Code
To enable HTTPS for the front-end development server, first copy the .env.development.local file to the root directory of your front-end project. This file provides the paths to the PEM and KEY files generated by the back-end script. The content in generated .env.development.local is as follows:
SSL_KEY_FILE=C:\ProgramData\Demo\demo-key.pem
SSL_CRT_FILE=C:\ProgramData\Demo\demo-cert.pem
HOST=demo.local
PORT=44301
Next, configure HTTPS in your Vite configuration file (vite.config.ts or vite.config.js) to use these certificate files. For example:
...

export default defineConfig(({mode}) => {
  const env = loadEnv(mode, process.cwd(), '');
  const host = env.HOST || 'localhost';
  const port = Number(env.PORT) || 5173;
  const keyPath = env.SSL_KEY_FILE || 'certs/localhost-key.pem';
  const certPath = env.SSL_CRT_FILE || 'certs/localhost.pem';
  return {
    plugins: [react()],
    server: {
      host,
      port,
      https: {
        key: fs.readFileSync(path.resolve(keyPath)),
        cert: fs.readFileSync(path.resolve(certPath)),
      }
    },
  };
});

...
Key Takeaway
To simplify the setup of HTTPS for both back-end and front-end projects, a PowerShell script automates the creation of IIS sites, Application Pools, and self-signed certificates. The script generates multiple artifacts, including PFX, CER, and PEM/KEY files, and updates the system hosts file for local DNS resolution.
For front-end development, an .env.development.local file provides paths to the PEM/KEY files, allowing secure, cross-platform HTTPS setup with Vite. Using the same certificate for both back-end and front-end also helps prevent cross-origin (CORS) issues during local development.
Additionally, a cleanup script is provided to remove all generated artifacts, enabling users to reset and re-run the configuration safely.
By automating certificate generation and sharing it between back-end and front-end, IIS configuration, and environment setup, these scripts significantly reduce repetitive manual steps, minimize errors, and streamline local development with HTTPS while avoiding cross-origin problems.